I was recently gifted the pedal pictured above. If you don’t know what a Maxon OD808 is, then you should have a look here: http://www.musiciansfriend.com/distortion-overdrive-effects-pedals/maxon-od808-guitar-overdrive-pedal
From the above link: “Originally released in 1979, the Maxon OD808 pedal was one of the first tube-amp overdrive simulators to hit the market. Its smooth, creamy crunch tone caught on quickly, and helped to launch a long line of imitators. Today, the OD808 design is without a doubt the most used, most imitated and most lauded overdrive circuit of all time. The reason for this is simple--tone. Simply put, the OD808 provides the natural, mild overdrive of a tube amp without sacrificing your guitar's original tone. In addition, it can be used as a clean booster to provide increased gain without compromising the sound of your amplifier.”
In short, it’s basically the original overdrive pedal that eventually got rebranded as the Ibanez Tubescreamer.
Unfortunately this particular one had a few issues. At first it looked like it was just missing a knob, but it turned out that all three pots were able to rotate freely (through 360 degrees) without affecting the sound at all. The pot shafts could also move in and out by about 6 mm, which really shouldn’t be the case.
So I took the back cover off to access the circuit board.
Removing the two screws at the bottom end of the board revealed a second board that houses the pots and status LED.
Removing that revealed exactly what I was expecting, which was that all three pots had fallen apart (evidently someone has tried to hold one together at some time in the past with a cable tie).
In fact you can see the top parts of the pots still attached to the enclosure:
Sadly this pedal has made a bit of a (bad) name for itself because of this exact issue. Not only are the pots prone to mechanical failure in this way, but it is also quite hard to find exact replacements, which in case anyone ever needs this information are as follows:
- Overdrive: A500K (ALPS brand, part number RK09L1140-F12-C0-A504)
- Tone: A20K (ALPS brand, part number RK09L1140-F12-C0-A203)
- Balance: B100K (ALPS brand, part number RK09L1140-F12-C0-B104)
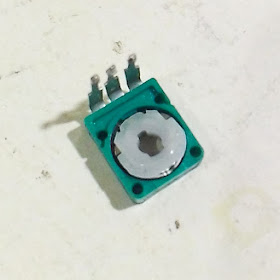
Having had little initial luck locating replacements, I decided to see if I could just put the pots back together. This was surprisingly easy to do and the fix feels pretty strong.
This worked for the Overdrive and Balance pots, but unfortunately the Tone one was still very spotty, even with a squirt of contact cleaner.
So this time I decided to completely remove and disassemble that pot. It breaks down into several parts, but on the plus side, it's surprisingly serviceable.
From top to bottom you can see the securing nut, the shaft collar, the shaft, the carbon strip/legs, the wiper, the back cover and the securing clip (which both holds the enclosure together and also secures it to the board).
So first I gave the carbon strip a good clean with contact cleaner and a cloth:
Then checked the wiper to make sure it was in shape and clean.
Then started putting the whole thing back together.
First the wiper is placed against the carbon strip, making sure that it is in a suitable position (i.e. not outside if its usual rotation range—I put it in what would be its middle position):
Then the back cover is replaced:
Now the shaft is located so that it sits correctly in the wiper part (the shaft has a little key so that it will only sit correctly in one position).
The collar is slid over the shaft and pushed solidly against the rest of the pot.
Before putting the clip back on, I slowly and carefully bent the ends so that they were close to straight:
And then bent the whole legs so that they were a little tighter than parallel.
This was so that they wouldn’t have a tendency to open after putting the pot all back together.
Finally, the ends were pressed back into a 90 degree angle:
The pot was tested and passed with flying colours:
And re-soldered to the board:
Finally the whole thing was put back together and correct replacement knobs were put on too.
I tried it out (it works fine) and have to say this pedal sounds great and is definitely a keeper.


Hey Stu! Great stuff on this blog. Just wanted to let you know that you've been featured on the GuitarAdventures Facebook & Google+ pages. We had a lot of good feedback from people who enjoyed your blog. You can see them here:
ReplyDeleteGoogle+ (over 120 +1's!)
https://plus.google.com/u/0/b/103176203991408345771/+GuitarAdventures1/posts/4K6H88V5oQN
Facebook
https://www.facebook.com/guitaradventure/posts/1122275361133215
Thanks for providing such good content here and we'd love to cooperate more if you're interested. At the very least, we'd love to be featured on your "Blogs I Like" section!
Hey Josh, thank you and done.
ReplyDeleteYou are too smart.
ReplyDeleteThanks Tom. Now if only I could play even half as well as you!
ReplyDeleteThanx...x)
ReplyDeleteI'm going to fix my broken MaXon knobs today.
Hey man, thank you so much for these instructions! This helped me fix my OD808 quickly and easily. I didn't want to toss this one aside as it is a great pedal.
ReplyDeleteThanks Again!
Todd
If I could have the talent like this blogger to reconstruct my broken guitar pedals maybe i would have the need to buy new ones each time it gets busted.
ReplyDeleteHi, just wondering where did you end up getting the replacement knob from? (tone knob cap) I've been looking for one myself for quite some time. Thanks
ReplyDelete